From Zapier to SmolAgents: A Step-by-Step Guide to Automating Your Emails with AI


Who Is This For and Why Does It Matter?
As a data and AI consultant, I regularly interview people from a wide range of industries and backgrounds. Together, we try to identify recurring tasks — especially the annoying, time-consuming, or high-risk ones.
One task almost always comes up, no matter the sector: managing the inbox. For many professionals, it’s a daily struggle that consumes hours, adds stress, and disrupts focus. Every day, we have to sift through countless emails — identifying which ones are just spam, which ones we’re only copied on and can safely ignore, and which ones require our attention, sometimes urgently.
In this article, we’ll dive into how you can harness AI to streamline your inbox — starting with a simple, no-code-friendly approach to automatically tagging emails with labels like “Publicity,” “Unread,” or “Urgent.”
I’ll also show you how to build your own AI-powered email assistant using smolagents from Hugging Face — capable of checking your inbox and answering questions like: Do I have new emails? Who are they from? What are they about? Can you summarize them? Are any urgent?
These tutorials require minimal coding and open the door to building a more interactive, intelligent email companion.
To me, these are two of the most balanced approaches to email automation. Some people are comfortable letting AI handle simple emails autonomously, while others aren’t ready to give up that level of control. These small first steps offer a middle ground: they help surface the most important messages, summarize them in a few lines, or raise questions about them — all without taking action on your behalf. Your AI assistant becomes a helpful guide, not an independent decision-maker, ensuring you remain in full control of your inbox.
This automation is perfect for anyone looking to start integrating AI into their workflows in a simple and practical way. Additionally, labeling your emails makes it easier to categorize them, delete those that are unnecessary, or archive them once handled. Keeping irrelevant emails serves no purpose — neither for your productivity nor for the environment — as storing excess data contributes to unnecessary memory consumption.
However, this agent reads your email content, so always use caution when granting access — especially if adapting the code for shared or production environments.
AI vs AI Agent ?
To clarify, let’s first distinguish between a simple AI model and an AI agent.
A standard AI model, like those used in chatbots or image classifiers, is designed to process data, generate predictions, or answer specific questions. However, these models don’t act autonomously — they respond when prompted, but they don’t initiate actions or manage workflows on their own.
An AI agent, on the other hand, combines AI capabilities (like understanding or generating text) with decision-making and action capabilities. This is what makes them so transformative.
When we talk about using AI to improve productivity, we increasingly refer to AI agents — systems that don’t just classify or predict, but also decide what to do next and actually execute actions in your tools and apps.
For example, an AI agent could analyze your incoming emails, determine which ones are urgent, and automatically apply labels in your inbox — without you needing to intervene. Beyond email, agents can also write documents, save files in the right folders, or even trigger actions across different apps, effectively orchestrating complex workflows.
In short, an AI agent is an autonomous system that senses, decides, and acts — combining traditional AI capabilities with the power to take meaningful actions in your environment.
In recent years, no-code and low-code solutions have made it incredibly easy to build simple AI agents — including for use cases like email management.
In the first part of this article, we’ll be using Zapier, a no-code automation platform that natively integrates with ChatGPT, to build our own mini agent. Indeed, we’ll be building a simple AI-powered automation, sometimes referred to as a ‘mini AI agent’. While it’s not a fully autonomous AI agent capable of making independent decisions, it’s a perfect first step into the world of AI-assisted workflows — all without writing a single line of code.
Here’s how it works: the mini agent is automatically triggered whenever a new email arrives. The email’s content is then sent to ChatGPT, which analyzes and classifies it. Based on the classification (urgent, unread, publicity), the mini agent applies the appropriate label directly to the email.
While the AI processing happens behind the scenes, the result — a clear label on each email — will be visible and immediately useful to help you prioritize your inbox.
Let’s dive in and start building!
Part 1 — A No-Code Approach: Label Your Emails Automatically with Zapier
Step 0: Getting Started with Zapier — Create Your Account and First Zap
We’ll be using Zapier, a no-code automation platform you can access here. With Zapier, you can easily automate workflows and repetitive tasks — a process we’re presenting here as a mini AI agent. It’s a great first step to help your team get comfortable with AI-enhanced automation and start understanding the potential of AI agents.
To get started, simply click on “Sign Up” in the top-right corner of the Zapier homepage to create your account and follow the steps provided. This process is similar to signing up on any other platform, and the login step works the same way.
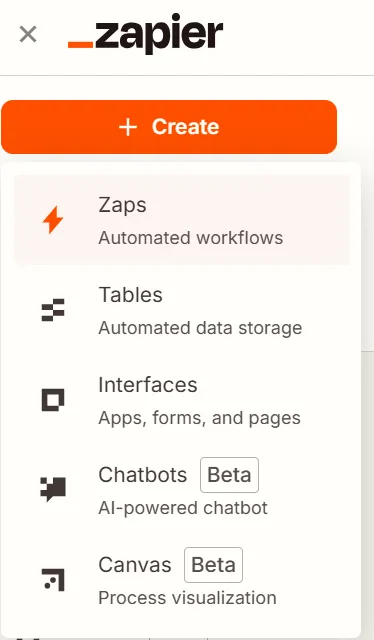
Once you’re logged in, you’ll be ready to start creating automated workflows — including the mini AI agent we’re building in this guide. In Zapier, these automated workflows are called Zaps.
You’ll see a page like this, with an orange “Create” button just below the Zapier logo. Click this button, and you’ll be presented with several options — the first one is “Zaps”, which is the option we need to select to create our mini AI agent.
Step 1: Setting the trigger
Once you click on ‘Create Zap,’ you’ll be redirected to this page — a draft of your automation flow.

In this case, it’s a mini AI agent that you’ll later publish. It can remain private and only accessible to you, but publishing it allows you to activate the Zap, making it work and triggering it when you receive an email. The trigger appears in the first grey rectangle of the image.
Left-click on the word ‘Trigger’ and select your mailbox type. For example, Gmail and Outlook can be used with a Zap. In my case, I’m using Gmail. Once I click on Gmail, I can set up the trigger. The right side of the interface should look like this:

In the ‘Trigger Event’ section, select ‘New Email.’ Under ‘Account,’ choose the email account you want the Zap to use. You’ll need to authorize Zapier to access this account to proceed with the next steps. Once done, click ‘Continue’ at the bottom of the settings panel.
In the ‘Configure’ section, you can specify which email labels to consider (at least in the Gmail version). Here, we will select ‘INBOX’ to track incoming emails while excluding sent ones. Alternatively, we could filter emails based on labels like ‘Spam’ or ‘Important,’ but for this use case, we will track all inbox emails.
By clicking ‘Continue,’ you will be taken to the ‘Test’ section, where you can test the trigger. Clicking ‘Find new records’ will search your email account for recent emails and display them as ‘Email A,’ ‘Email B,’ etc. If this list appears and matches your recent emails, the trigger is successfully set up and functional. We can now move on to Step 2 by selecting an email from the list, clicking on it, and then choosing ‘Continue with selected record’.
Step 2: Creating your labels
We’re now going to create labels in our mailboxes. I’ll be using Gmail for this tutorial, but Outlook works as well since it’s supported by Zapier. That said, at least for Gmail, you won’t be able to use the default system labels through Zapier for this kind of use case. This tutorial will focus on Gmail, but if you’re using Outlook, you can refer to Microsoft’s documentation for instructions on how to create custom labels.
On the left of you gmail inbox screen, you can find the term “Labels” :

Click on the “+” button to create your labels. In my case, I’m keeping it simple with three categories: “Urgent,” “To Read,” and “Publicity.” Of course, you can customize both the number of labels and their names to suit your needs, especially since most mailboxes already include basic spam filtering. Once you’ve chosen your label names, you can skip the optional setup steps and just click “Create.”
Your newly created labels will now appear on the left side of your screen under “Labels.” By clicking on the three vertical dots next to each label, you can also assign a color to help visually distinguish them in your inbox.
Step 3: Setting the actions
Now, let’s go back to Zapier and return to our Zap draft to set up the actions that will follow the trigger.
At the end of Step 1, you clicked on “Continue with selected record,” which prompted you to choose a platform for the action. In this case, we want to use a chatbot, such as ChatGPT or Claude. Since I have a premium account with ChatGPT but not with Claude, I’ll be using ChatGPT for this setup.
Next, we need to configure this action step. Under “Action,” select “Conversation” for ChatGPT or “Send a message” for Claude. This will send your request to the chosen platform. The request itself will be defined during the setup process in the following steps.

In the “Account” section, you will be asked to connect to either OpenAI or Anthropic to obtain an API key, which allows Zapier to interact with the platform. Follow the guided steps, and once completed, click “Continue.” You will then need to choose a specific OpenAI model. I opted for gpt-3.5-turbo-instruct. You may change the model, but it needs to be compatible with the “Send prompt” action. The prompt can be customized based on your needs, but here is the one I used:
“Can you summarize the subject of the attached email? Is it urgent, purely informational, or does it require a response? In your reply, you should only return one of the following labels: Label_9197795683686362960 if the email seems urgent, Label_662747571271887962 if it is a newsletter or something similar like an advertisement or spam, and Label_6307763309029050364 if it is a work-related email (e.g., client correspondence, meeting notifications, or messages from colleagues). Do not include any other text besides the label.”
Replace the label IDs with the ones you used in the previous step. In this example, the labels correspond to Gmail categories: Label_9197795683686362960 for “Urgent,” Label_6307763309029050364 for “To Read,” and Label_662747571271887962 for “Publicity.” In other words, we’re instructing ChatGPT to classify incoming emails based on their content.
Since the prompt references the email body, we need to provide this data to ChatGPT. To do so, click on the “+” icon (see the screenshot below) in the prompt field and add the following variables :
- Body Plain
- Subject
- Message ID
- All Attachments
As shown in this screenshot, they appear right at the end of the prompt:
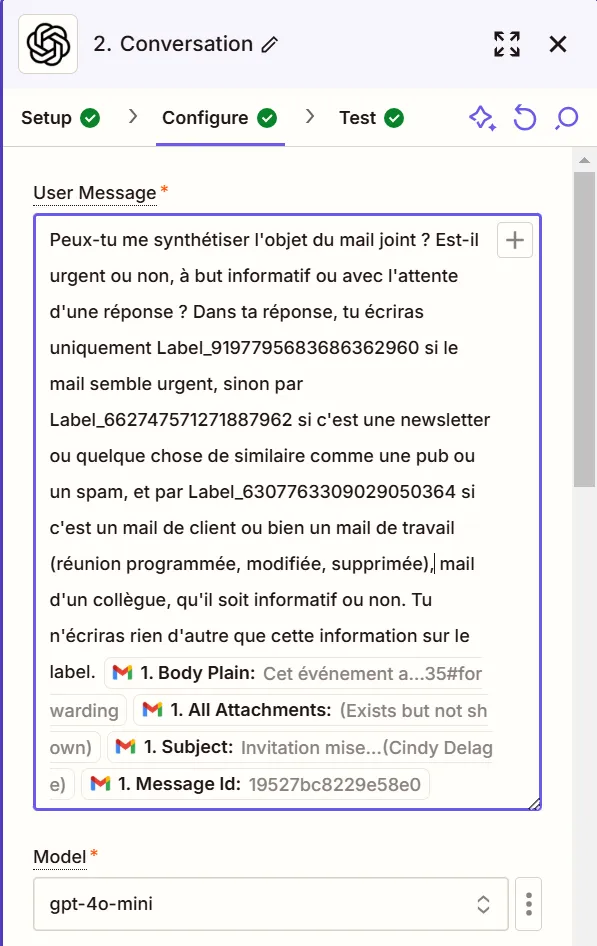
By including these elements, ChatGPT will have access to the necessary information for every new email, allowing it to classify messages accurately.
The other parameters do not need to be changed for this type of classification, so you can click on “Continue” and then on “Test Step” in the “Test” tab. If no error message appears, you can click on “Publish,” and we will proceed to the final setup step.
Final step: Automatically labeling your emails
Now, let’s add the final step. We’ll be using our email platform — Gmail, in my case — with the “Add label to email” action. Make sure you’re using the same account as in Step 1, then click “Continue” to move on to the “Configure” section.
Under “Label,” click the three vertical dots and select “Custom.” A “+” button will appear — click it and choose “2. Reply,” which corresponds to ChatGPT’s response to your prompt and should contain a label ID.
Next, in the “Message” field, click the three vertical dots again and select “Custom.” Click the “+” button and choose “1. New email on Gmail,” then select “Message ID.”

Click “Continue,” and Zapier will offer to test your Zap. Simply click “Test step.” If everything is set up correctly, you’ll be ready to publish your Zap.
To confirm it’s working, check the test email you used in Step 1 — you should now see the correct label automatically applied.
Finally, click “Publish” to activate your Zap. From now on, every time you receive an email, labels will be added automatically!
To summarize, here is what the workflow should look like in Zapier, including all the steps: the trigger and the two following actions:

Part 2 — Taking It Further: Your Next Inbox Assistant, Powered by ‘smolagents’
This Zap is great for anyone looking for something quick to set up and effortlessly automatic. It runs quietly in the background, labeling emails based on simple rules — no interaction, no questions to ChatGPT. Just a helpful assistant doing its job behind the scenes.
But if you’re ready to take things a step further, Hugging Face has introduced a new library called ‘smolagents’. With it, you can build an agent that reads your emails, tells you how urgent they are, summarizes them, or pulls out specific information on demand.
Setting it up does require a bit of curiosity — you’ll need to be comfortable navigating Hugging Face tools and writing a bit of Python. But don’t worry: it’s totally beginner-friendly and a great way to dip your toes into intelligent automation.
To be completely accurate, the agent won’t be performing any strong actions at this stage, such as deleting or automatically responding to emails. Instead, it will select the tools it needs to answer your query, along with a reasoning step. The agent has access to both native tools (such as web search to check the definition of “urgency” and common related terms) and custom tools — like the one we will build here. It can decide to use either, depending on its needs.
Step 0 : Creating your Hugging Face space
Hugging Face Spaces let you host lightweight applications directly in your account. In our case, we’ll use it to deploy a custom agent you can chat with through a simple, visual interface — very similar to ChatGPT. The difference? This one is connected to your email account. You’ll be able to ask it how urgent a message is, extract specific information, get summaries, and more.
To get started, you’ll first need a Hugging Face account (or create one if you don’t have one yet), and then create a new Space.
You can do this by clicking on your profile icon in the top-right corner, then selecting “New Space,” as shown in the screenshot below:

We’ll now be using the smolagents library — a new tool from Hugging Face designed to help you build AI agents that can actually take actions. You can connect them to custom tools, integrate RAG pipelines, and much more.
The next steps will get straight to the point, walking you through the essentials to get your email agent up and running. That said, this walkthrough builds on concepts from the Hugging Face AI Agent course, which was super helpful in shaping this project.
If you’re curious about how things work under the hood, or if you’re thinking of building an agent for a different use case, I highly recommend checking out the course!
Step 1 : Giving Your Agent Access to Your Emails with a Custom Tool
We’re now going to write the tools.py file, which will contain the Python code for defining a custom tool class. In this example, we’ll focus on connecting to a Gmail account, based on the tutorial linked below. However, you can adapt it to work with other email providers like Outlook, as long as you can create an API connection for your agent (you’ll find tutorials online for each specific service).
The linked guide walks you through everything you need to activate and configure the Gmail API, and provides the core code we’ll reuse in our custom tool class. So instead of repeating it here, we’ll go straight to the final class.
Below is the full code for tools.py, followed by a breakdown of how it works.
from smolagents import Tool
import os.path
import email
import base64
from google.auth.transport.requests import Request
from google.oauth2.credentials import Credentials
from google_auth_oauthlib.flow import InstalledAppFlow
from googleapiclient.discovery import build
from googleapiclient.errors import HttpError

# If modifying these scopes, delete the file token.json.
SCOPES = ["https://www.googleapis.com/auth/gmail.readonly"]

class Mail_retriever(Tool):
    name = "unread_mails"
    description = "Fetches new and unread mails from gmail."
    inputs = {
        "user_cred": {
            "type": "string",
            "description": "The name of the user whose emails are being retrieved."
        }
    }
    output_type = "string"

    def forward(self, user_cred: str):
        creds = None
        if os.path.exists("token.json"):
            creds = Credentials.from_authorized_user_file("token.json", SCOPES)
        # If there are no (valid) credentials available, let the user log in.
        if not creds or not creds.valid:
            if creds and creds.expired and creds.refresh_token:
                creds.refresh(Request())
            else:
                flow = InstalledAppFlow.from_client_secrets_file("credentials.json", SCOPES)
                creds = flow.run_local_server(port=0)
            # Save the credentials for the next run
            with open("token.json", "w") as token:
                token.write(creds.to_json())

        try:
            # Call the Gmail API
            service = build("gmail", "v1", credentials=creds)
            results1 = service.users().messages().list(userId="me", labelIds=["INBOX", "UNREAD"]).execute()
            messages = results1.get("messages", [])

            if not messages:
                print("No unread mails")
                return

            print("Messages:")
            for mail in messages:
                result = service.users().messages().get(userId="me", id=mail["id"], format="raw").execute()
                mail_content = email.message_from_bytes(base64.urlsafe_b64decode(result["raw"]))
                message_main_type = mail_content.get_content_maintype()

                if message_main_type == "multipart":
                    for part in mail_content.get_payload():
                        if part.get_content_maintype() == "text":
                            result = part.get_payload()
                elif message_main_type == "text":
                    result = mail_content.get_payload()

            return f"{user_cred}, you have new mails: {result}."

        except HttpError as error:
            # TODO(developer) - Handle errors from gmail API.
            print(f"An error occurred: {error}")
This code builds on the tutorial we linked earlier, which explains how to connect Python to Gmail. However, it’s been adapted to fit the structure required by the smolagents library.
Here’s how it works: we define a class that inherits from Tool, which signals to the library that it’s a custom tool the agent can use. We give this tool a name and a description — both are important, as they help the agent understand what the tool does and when to use it.
We also define the expected input format — in this case, it’s the user’s name as a string. It’s optional, but can help the agent personalize its responses. The output type is specified as well, which lets the agent handle the result properly and act autonomously.
The heart of the tool is the forward method — this is a required method name in the smolagents framework. Inside it, we write the logic to either read the credentials file (if it already exists) or create it (if it doesn’t).
Once the agent is connected to your inbox, it checks for new messages — filtered by label IDs, which you can customize at line results1 = service.users().messages().list(userId=”me”,labelIds=[“INBOX”,”UNREAD”]).execute(). When a new email is detected, the tool returns the full text content of the message. This is a key improvement over the original Gmail API tutorial, which only retrieves metadata — not enough for summarization or urgency detection.
Step 2 : Define Your Project Dependencies
As with any project repository, you will create a requirements.txt file in your main folder, listing all the libraries used in your code. In our case, this file contains the following lines, which you can copy and paste directly:
smolagents
google.auth
google_auth_oauthlib
google-api-python-client
smolagents is the core library used to configure your autonomous agent and equip it with custom tools. Originally introduced and featured by Hugging Face, it’s designed to keep agents lightweight, modular, and easy to compose.
To connect your agent to Gmail, you’ll need a few Google-related libraries: google-auth, google-auth-oauthlib and google-api-python-client.
These handle authentication (via OAuth 2.0) and API access to your Gmail inbox — allowing the agent to read, analyze, and respond to emails.
For the user interface, this project uses Gradio, which provides a fast way to build a web-based frontend. Most Hugging Face Spaces already include Gradio by default, but if it’s not present, you can add it by including a simple line in your requirements.txt:
gradio
Whenever you modify or add code files, make sure all necessary dependencies are properly listed. A quick manual method is to check the import statements at the top of each file and verify that each corresponding library is included in requirements.txt. Once done, save the file at the root of your project directory — Hugging Face will use it automatically during deployment.
Step 3 : Bring It All Together in app.py
The app.py file is the main entry point of your application. It defines your agent, integrates any custom tools, selects the language model to use, and launches the Gradio interface.
This file typically follows a standard structure:
import gradio as gr
from smolagents import GradioUI, CodeAgent, HfApiModel
# Import our custom tools from their modules
from tools import Mail_retriever
# Initialize the Hugging Face model
model = HfApiModel("Qwen/Qwen2.5-Coder-32B-Instruct", max_tokens=10000)
# Initialize the weather tool
mail_tool = Mail_retriever()
# Create Alfred with all the tools
alfred = CodeAgent(
tools=[mail_tool],
model=model,
add_base_tools=True, # Add any additional base tools
planning_interval=3 # Enable planning every 3 steps
)
if __name__ == "__main__":
GradioUI(alfred).launch()
It imports all the required libraries and modules, including your custom tool from tools.py — in this case, Mail_retriever.
The language model is initialized using the Hugging Face API. In this example, we’re using Qwen2.5-Coder-32B-Instruct model directly via its Hugging Face hub ID.
Next, we instantiate our tool — here, a simple email retrieval tool — and configure the agent. We call it Alfred, equipping it with the custom tool, the language model, and some optional parameters like planning frequency.
Finally, we initialize and launch the Gradio UI, making the app interactive and ready to deploy.
This layout provides a clean, modular foundation for building and scaling your AI agent. You can easily add new tools, swap models, or extend the logic in future iterations.
And just like that, you’re done.
Once you commit the changes to your Space, the app will launch and display your chatbot’s interface. You can now try a prompt like:
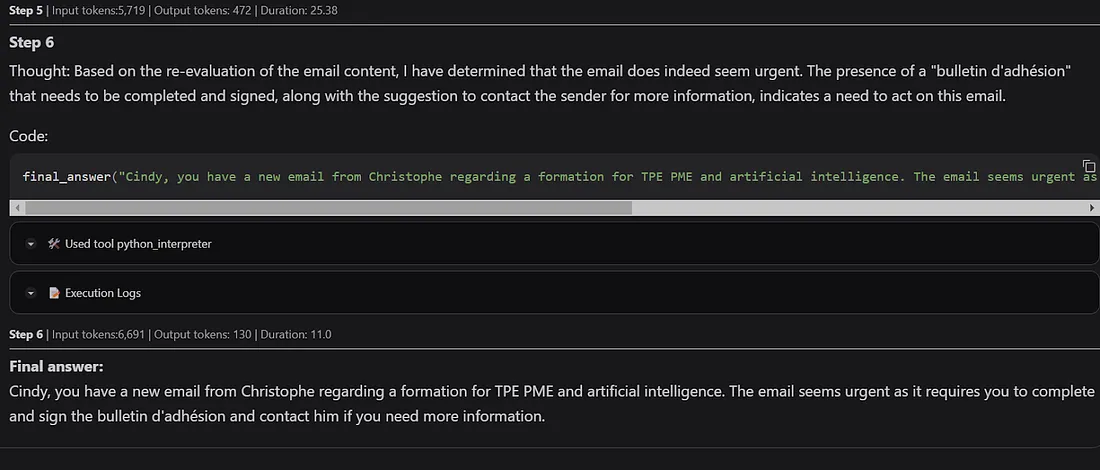
“Hi, my name is Cindy and I’d like to know if I have any new emails on Gmail. If so, do they seem urgent? Use the only custom tool that you have.”
The agent will process your request, showing each reasoning step and which tools are used along the way.
Below are a few screenshots illustrating how the assistant handled my own prompt. The email it analyzed was an automatic message I received after registering for a training program. I was asked to reply and complete the bulletin d’adhésion — which, of course, is urgent if I want to secure my spot in the session.


What’s Next? Toward a Truly Smart AI Agent (Opportunities for Improvement)
These mini-agents are still quite simple. For instance, automatic replies aren’t implemented yet, and the notion of urgency can vary depending on the context or how the prompt is phrased — both of which are areas for future improvement. That said, this prototype offers a great first step into the world of automation and agent-based workflows, using a lightweight, low-code approach.
One of the key advantages of the smolagent library is transparency: you can follow every step of the agent’s reasoning process. That makes debugging much easier — if something goes wrong, you’ll see exactly where and why.
With just a few lines of code and a custom tool, we’ve created an email assistant that starts to reason like a human. There’s still a long way to go — but the foundations are here. Give it a try, and imagine what your own smart agent could do.