
| {"title": "Attivo through SIEM setup for Workbench", "url": "https://support.expel.io/hc/en-us/articles/1500002719001-Attivo-through-SIEM-setup-for-Workbench", "date": "2021-02-17T20:44:59Z", "contents": "This article explains how to connect Attivo to Workbench.\n\n#### In this article\n\n * Step 1: Enable console access\n\n * Step 2: Logging Attivo using Sumo Logic and Splunk\n\n * Step 3: Configure Attivo in Workbench\n\n * Step 4: Edit the device to add console access\n\n## Step 1: Enable console access\n\nHaving read-only access to the interface of your technology allows Expel to\ndig deeper during incident investigations. Our device health team uses this\naccess to investigate potential health issues with your tech.\n\n### Note\n\nExpel secures all login information our SOC analysts need about your devices\nin a MFA password product. Access to this login information is protected using\nour internal MFA processes. To learn more about the IP addresses all Expel\ntraffic comes from, go here.\n\n 1. Administration > User Accounts > Configure.\n\n 2. Select +Add from the Users List.\n\n * For User Type select local.\n\n * Select Privileges checkbox for Admin.\n\n * For Username type expelsoc.\n\n * For First Name type Expel.\n\n * For Last Name type SOC.\n\n * Type a Password.\n\n 3. Click Save.\n\n### Note\n\nAfter console access is established, the remaining onboarding steps for this\ntechnology can also be performed by Expel. Reach out to your engagement\nmanager and we're happy to complete the integration!\n\n## Step 2: Logging Attivo using Sumo Logic and Splunk\n\nRefer to your SIEM documentation or work with your SIEM representative to port\nin Attivo logs. You can also refer to the following web references for\ncreating a new Syslog source:\n\nSumo Logic: https://help.sumologic.com/docs/send-data/installed-\ncollectors/sources/syslog-source/\n\nSplunk:\nhttps://docs.splunk.com/Documentation/Splunk/7.0.2/Data/Monitornetworkports\n\n## Step 3: Configure Attivo in Workbench\n\nNow that we have the correct access configured and noted the credentials, we\ncan integrate your tech with Workbench.\n\n 1. In a new browser tab, go to https://workbench.expel.io/settings/security-devices?setupIntegration=attivo.\n\n 2. Select the Assembler with network connectivity to the Attivo device. Select the SIEM you created earlier.\n\n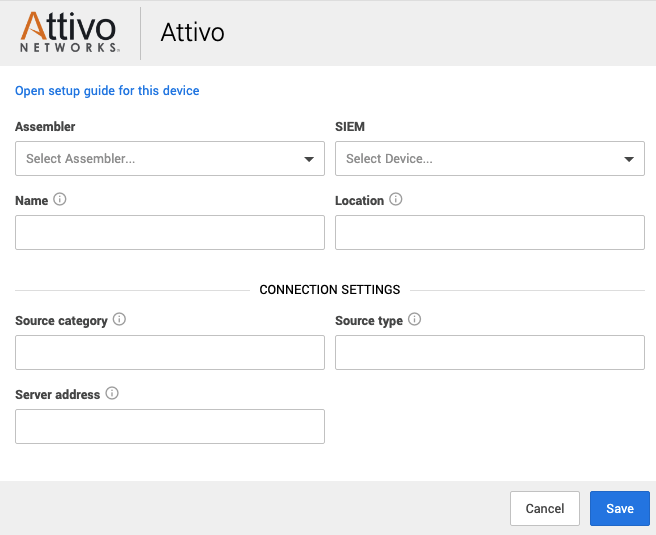\n\n * For Name type the host name of the Attivo device.\n\n * For Location type the geographic location of the appliance.\n\n * For Source Category, type the Sumo Logic source category for this device.\n\n * For Source Type (SIEM that contains the data) type the Splunk source type for this device.\n\n * For Server address type the address of the server for console access.\n\n 3. Click Save.\n\n 4. You can provide console access now or set it up later. Use the instructions below to set it up later.\n\nYou can see if the device is healthy on the Security Devices page. It may take\na few minutes to see the device listed as healthy.\n\nTo check if alerts are coming through, navigate to the Alerts Analysis page.\nScroll to the device you want to check and click View alerts. Switch to grid\nview, then check the list for device alerts. It can take 36 to 72 hours for\nalerts to appear after setup, as we tune your device.\n\n## Step 4: Edit the device to add console access\n\nExpel needs console access to your device to allow our SOC analysts to dig\ndeeper during incident investigations. Additionally, our engineering teams use\nthis access to investigate potential health issues, including proper alert\ningestion.\n\n### Note\n\nExpel secures all login information our SOC analysts need about your devices\nin a MFA password product. Access to this login information is protected using\nour internal MFA processes. To learn more about the IP addresses all Expel\ntraffic comes from, go here.\n\n 1. Open Workbench. Go to Organization Settings > Security Devices. Next to the device you just connected, click the down arrow and click Edit.\n\n 2. In the Console Login area, type these details:\n\n * Console URL: type the console URL from the Server address in the Connection Settings area above. At the end of the URL, type **/login**.\n\n * Username: type the user name you created above.\n\n * Password: type the password you created above.\n\n * Two-factor secret key (32-character code): depending on how your organization enforces log-ins, this field may not apply to you. In these cases, you can leave it blank. This field is optional and if you have questions or concerns, reach out to your engagement manager or to support.\n\n 3. Click Save.\n\n### Tip\n\nThis article was accurate at the time of writing, but changes happen. If you\nfind the instructions are outdated, leave a description in the comment field\nbelow and let us know!\n\n"} |